
Authorize
Use the Sonos login service to authenticate with a Sonos user's household. The login service uses the OAuth 2.0 authorization framework and three-legged authentication. Three-legged authentication includes three participants, the user, your integration, and Sonos. These participants interact in three stages:
- Your integration sends the user to the Sonos login service with your client credentials and parameters.
- The user authenticates with Sonos and Sonos sends an authorization code back to your integration.
- Your integration uses the authorization code to get an access token and a refresh token from Sonos.
Your integration then sends your access token to Sonos in every API call. When the access token expires, your integration can use the refresh token to get a new one. See the Authorize Code Grant flow in the OAuth RFC for more information.
See Authorization API for a list of APIs.
Before you start
Create a new control integration and get client credentials to identify your integration on Sonos.
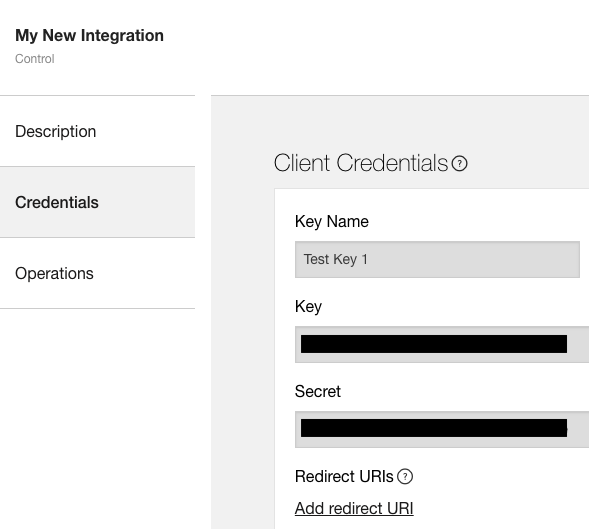
Create client credentials
Sonos uses client credential keys to identify integrations that use the Control API. To get a client credential key, go to the integration manager and:
- Click New control integration.
- Fill out the name and description of your integration and choose a category that describes the type of integration you are creating. The name you use for your integration is the name that Sonos users will see on the authorization screen for the Sonos login service. See below for an example of the authorization screen. Click Continue.
- Enter a name for the key, such as your
appIdor the name of the product family that will use this key. - Click Save to generate your key.
Provide a redirect URL
You'll also need a redirect URL so that the Sonos login service can send the user back to your client with an authorization code.
The redirect URL must meet the following requirements:
- It must be publicly routable.
- It must be HTTPS.
Once you have a key and redirect URL, you can create the link to send the user to the Sonos login service.
Send the user to the Sonos login service
Send the user to the Sonos login service with your key and parameters. For example, with a button instructing the user to enable your integration to use Sonos. This button should use the create authentication code API to send your key and redirect URI to Sonos. Construct the request URI by following the instructions in the Authorization Request instructions in the OAuth 2.0 RFC (RFC 6749) to do this. Issue a GET request to https://api.sonos.com/login/v3/oauth with the following query string parameters:
client_id— your client credential key.response_type— use "code" to signify authorization code.state—an opaque value that you can use to maintain state between the request and callback. Sonos adds this back to your redirect URL when it redirects the user back to your service after login.scope— Useplayback-control-all.redirect_uri— URL encoded value of your Redirect URI. This must match one of the redirect URLs that you provided for your key in the integration manager. This must be a client-side request as the Sonos login service displays Web pages to the user to prompt them to login to their Sonos account and allow your integration to access and control their Sonos household.
See Create Authorization Code for details about these fields.
For example:
<button
onclick="location.href='https://api.sonos.com/login/v3/oauth?client_id=YourAPIKeyGoesHEre&response_type=code&state=testState&scope=playback-control-all&redirect_uri=https%3A%2F%2Facme.example.com%2Flogin%2Ftestclient%2Fauthorized.html'"
 type="button">
Sign in with Sonos
</button>
The user authenticates with Sonos
The login service asks the user to authorize your integration to use their Sonos system. The user authenticates with Sonos. Sonos sends an authorization code back to your integration.
The user authorizes your integration with a scope
OAuth 2.0 scopes enable the resource owner to control what the client can do once they've given access. Scopes are tied to access tokens. Sonos currently has one scope, playback-control-all, which enables clients to do the following on the user's Sonos system:
- See what's playing
- Change playback and volume
- Change rooms and groups
- Play favorites and playlists
Sonos may add more granular scopes in the future.
Here's an example of the authorization screen that users see for the permissions enabled by the playback-control-all scope:

Sonos sends an authorization code to your integration
Once the user gives consent to your integration, Sonos sends an authorization code to the redirect URI you provided. See Create Authorization Code for a sample response.
Get an access token
Once you've gotten an authorization code, use it to get an access token and refresh token. Use the access token to send API calls to the household through the Sonos cloud. This step uses your client secret, so it should be a server-side request rather than a client-side (browser-based) request.
Use the create token API to construct the access token request. Send a POST to https://api.sonos.com/login/v3/oauth/access or test using createToken.
See Access Token Request instructions in the OAuth 2.0 RFC (RFC 6749) for details.
Here's an example using curl:
curl -X POST -H "Content-Type: application/x-www-form-urlencoded;charset=utf-8" \
-H "Authorization: Basic {YourBase64EncodedClientId:SecretGoesHere}" \
"https://api.sonos.com/login/v3/oauth/access" \
-d "grant_type=authorization_code&code=93713fe8-33aa-460c-97bd-320d7ae8679f&redirect_uri=https%3A%2F%2FACME.example.com%2Flogin%2Ftestclient%2Fauthorized.html"
And an example response:
{
  "access_token": "d7cdf58d-d43c-412c-8887-6d7f95b6557e",
  "token_type": "Bearer",
  "expires_in": 86400,
  "refresh_token": "585fb433-359c-4419-ac53-946106e5bbab",
  "scope": "playback-control-all"
}
Pass client ID and secret to Sonos securely
Since you're passing your client ID and secret over HTTP, you need to Base64-encode your client ID and secret using a colon as a delimiter to encode any non-HTTP-compatible characters. Note that this does not secure your client ID and secret. Be sure to use HTTPS to secure your communications. Here's the syntax:
Authorization: Basic {base64-encoded 'client_id:client_secret'}For example, for client_id:
d68b5d8e-b711-4321-9a0b-b7ade8b22b5dand client_secret:
b1d4ab27-9824-7841-a8dc-1eba69fc5225the Base64-encoded clientid:secret string would be:
ZDY4YjVkOGUtYjcxMS00MzIxLTlhMGItYjdhZGU4YjIyYjVkOmIxZDRhYjI3LTk4MjQtNzg0MS1hOGRjLTFlYmE2OWZjNTIyNQ==Send the access token to Sonos
Send your access token to Sonos in every API call. Use the "Bearer" authentication scheme to transmit the access token. See the OAuth 2.0 RFC for details.
If your access token doesn't have the playback-control-all scope, or if it is expired, you'll receive an HTTP 401 with "Incorrect token".
Here's an example call to play content that shows the Authorization header:
POST /api/v1/groups/RINCON_00012345678001400:0/playback:1/play HTTP/1.1
Host: api.ws.sonos.com/control/v1
Content-Type: application/json
Authorization: Bearer <token>
Refresh the access token when it expires
Access tokens expire after 24 hours. Use a refresh token to get a new access token when the one you have expires. Since this step uses your client secret, it should be a server-side request rather than a client-side (browser-based) request.
Use the refresh token API to construct the refresh access token request. Send a POST to https://api.sonos.com/login/v3/oauth/access or test using refreshToken with the following headers:
Content-Type: application/x-www-form-urlencoded;charset=utf-8Authorization: Basic {Base64 Encoded client_id:secret value}
See Refreshing an Access Token in the OAuth 2.0 RFC (RFC 6749) for details.
Here's an example using curl:
curl -X POST -H "Content-Type: application/x-www-form-urlencoded;charset=utf-8" \
-H "Authorization: Basic {YourBase64EncodedClientId:SecretGoesHere}" \
"https://api.sonos.com/login/v3/oauth/access" \
-d "grant_type=refresh_token&refresh_token=585fb433-359c-4419-ac53-946106e5bbab"
Here's an example response:
{
  "access_token": "f474be5c-fcb5-4626-aa9b-42d12192c660",
  "token_type": "Bearer",
  "expires_in": 86400,
  "refresh_token": "585fb433-359c-4419-ac53-946106e5bbab",
  "scope": "playback-control-all"
}