
Add programmed radio
With programmed radio, you can offer a generated sequence of tracks to listeners. You can generate tracks based on user preferences. Listeners can steer content by rating or skipping tracks. You can set polices to control the number of times listeners can skip content. You can also include ads that listeners cannot skip. You can offer programmed radio that follows Digital Millennium Copyright Act (DMCA) requirements.
A sequence diagram at the beginning of each section shows the piece of the experience you'll be building. Each section expands on the sequence diagram to create a fuller picture. At the end of the guide, you can review the complete diagram. To start, it's pretty slim, with nothing but your devices:

This guide uses http://localhost:3000 as the base URL of the cloud queue server. Replace it with a publicly accessible URL in your own implementation.
Definitions
Here's are some common terms used throughout:
- Cloud queue—a cloud queue server, which is a list of content hosted by your service in the cloud.
- Player—Sonos player. See Components and interfaces for details.
- Container—any group of tracks, such as an album, radio, or playlist.
Prerequisites and setup
Before you begin, you'll need to:
- Set up a SMAPI server with object IDs. See Getting started with Content Services for details.
- Set up account matching. See Account matching for details.
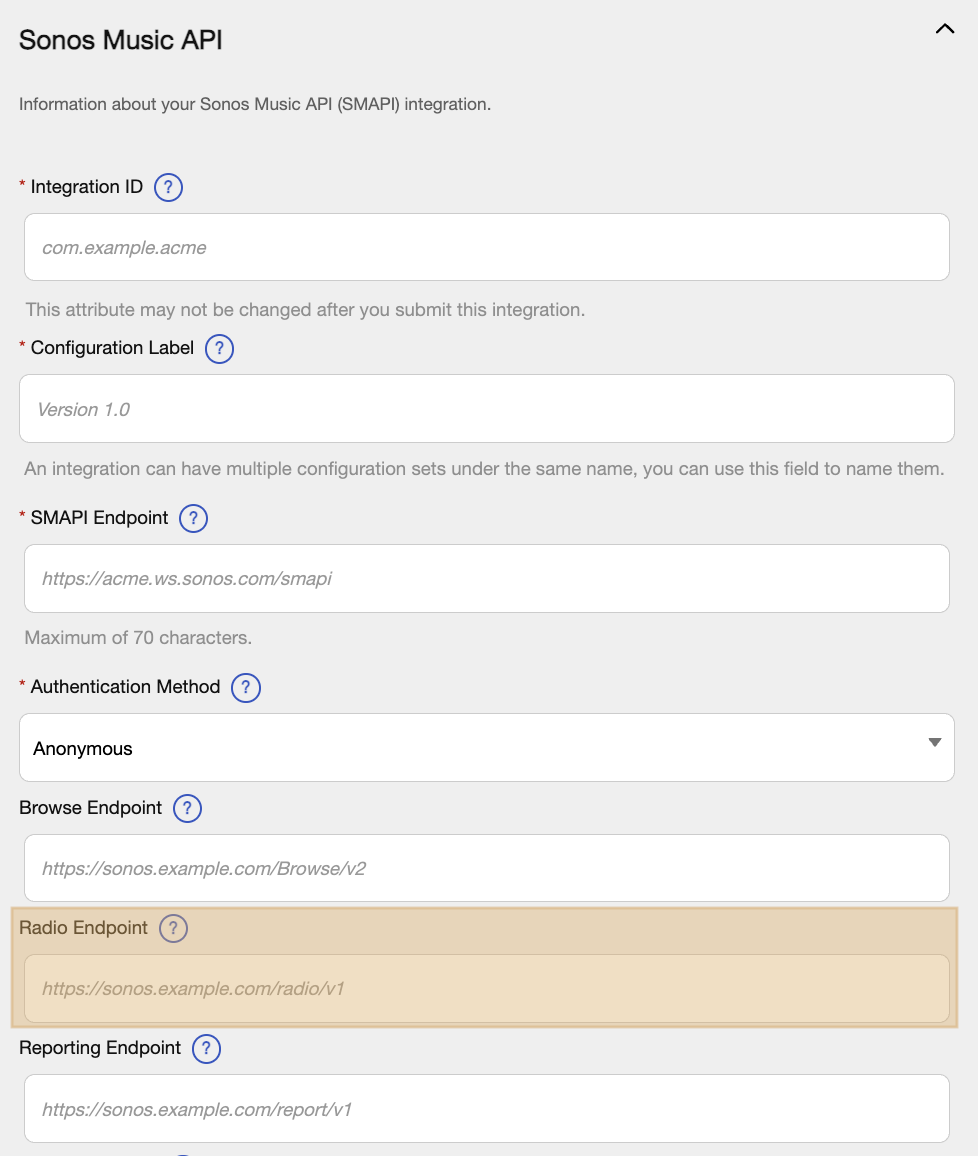
Add a radio endpoint to the submission form
The first part of setting up a cloud queue server is adding a radio endpoint to Sonos Music API page the integration submission form:
Set up a player with Dev Portal sandbox
Once you've filled out the submission form, test it on your Sonos system using the Dev Portal sandbox. See Test your service for details.
Add cloud queue endpoints
In its most basic form, a cloud queue server contains four endpoints:
To get started, set up a basic HTTP server using your favorite language, such as with Express and Node.js or Typescript, Django and Python, or Ruby on Rails, with those 4 endpoints. Before going any further, you should make sure those endpoints are all functional, so that they can be the framework for your cloud queue server. Here's an example using Express and Node.js:
const express = require('express')

const app = express()

app.get('/', (req, res) => {
    res.send('Welcome to Cloud Queue!')
})

app.get('/v2.1/radio/:containerId/context', (req, res) => {
    // Route for Cloud Queue Context
})

app.get('/v2.1/radio/:containerId/itemWindow', (req, res) => {
    // Route for Cloud Queue Item Windows
})

app.get('/v2.1/radio/:containerId/version', (req, res) => {
    // Route for Cloud Queue Versions
})

app.post('/v2.1/radio/:containerId/timePlayed', (req, res) => {
    // Route for Cloud Queue Reporting
})

app.listen(3000);
How the player uses endpoints
The Sonos player uses the endpoint URL in the manifest and the container ID to generate the request URL. For example, with the following parameters:
- URI for radio endpoint in manifest:
http://localhost:3000/playback/v2.1/radio - Container ID =
smapicontainer:42
If the Sonos listener started music using the Sonos app, the player would access the following endpoint URL to get the context:
GET http://localhost:3000/v2.1/radio/smapicontainer:42/contextThe player would access the following endpoint URL to get an item window:
GET http://localhost:3000/v2.1/radio/smapicontainer:42/itemWindowThese endpoints are specific to each playlist or container ID. As a best practice, you should build your implementation so it can handle a flexible URL with the container ID as a parameter in it.
Add a context endpoint
The following section goes over the sequence shown below:

The /context endpoint provides information about the state of the container, the container's playback policies and associated metadata, and reporting options. Without the context, the player has no information about how to play what you are telling it to play. Note that playback policies are immutable for the context, regardless of version. This means that in order to change them, you must reload the cloud queue with the loadCloudQueue command. See the Loading Cloud Queue section below for details.
Here's an example context request by the player:
GET http://localhost:3000/v2.1/radio/smapicontainer:42/contextHere's an example cloud queue response:
{
  "contextVersion": "CV:00001",
  "queueVersion": "QV:00001",
  "container": {
    "type": "trackList.program",
    "name": "Meat Loaf Radio",
    "id": {
        "objectId": "smapicontainer:42"
    }
  },
  "playbackPolicies": {
    "canSkip": true,
    "limitedSkips": true,
    "canSkipToItem": false,  // Note: These playback policies are the ones you want for DMCA Programmed Radio
    "canSkipBack": false,
    "canSeek": false,
    "canCrossfade": true
  },
  "reports": {
    "sendUpdateAfterMillis": 500,
    "periodicIntervalMillis": 20000
  }
}
See context for more details about the /context endpoint and requirements.
Containers
As part of your context, you need to have a container object, which describes the collection of tracks your queue is representing.
For example, the container in the player's response to GET /context was:
{
  ...
  "container": {
    "type": "trackList.program",
    "name": "Meat Loaf Radio",
    "id" : {
        "objectId": "smapicontainer:42"
    }
  },
  ...
}
Players require the name and id keys and values.
The name describes the name of the container. The type of the container allows the player to dissect your context and item windows correctly. See the container playback object for more details about containers.
The id is the unique identifier for the container. See the MusicObjectId playback object for details.
If you want listeners to be able to play your containers using the Sonos app via SMAPI, you'll need to add a MusicObjectId to your container so that your SMAPI implementation knows what container the user wants to play. See Load a cloud queue using a manifest file below for details.
Playback Policies
Playback policies describe the policies for playback of a container or a track. There are two different kinds of playback policies, policies for playback contexts, used in containers and policies for individual items. See Set playback policies to learn more. Because context policies are immutable, most of the policy work for your radio implementation will be done at the item level.
Item-level playback policies always take precedence over context-level policies. Skip enforcement relies heavily on item playback policies. Read more about skip enforcement in the section below.
Add a version endpoint
The player polls the /version endpoint frequently to discover whether there has been a change to your cloud queue server. For example, reordering of tracks or updates to the state of container types, metadata, or playback policies. If there has been a change, it will send a new /context or /itemWindow request. To determine which information the player should update, there are two version fields your cloud queue should return:
contextVersion—indicates a change in container metadata, such as the name of the playlist.queueVersion—indicates a change in the contents of the queue, such as order of tracks.
Here's a sample request:
GET http://localhost:3000/v2.1/radio/smapicontainer:42/versionHere's a sample response. For example, if you made a change to the context, such as changing a container name, but didn't change the queue, you would update the contextVersion in your response:
{
  "contextVersion": "CV:00002",
  "queueVersion": "QV:00001",
}
By examining the versions and taking note of the change, the player knows to fetch a new context from your /context endpoint. See version for more details.
Add an itemWindow endpoint
This section goes over adding an /itemWindow endpoint:

Players use the /itemWindow endpoint to discover what to play. The endpoint returns a window of content, such as radio, playlists, and other content. See itemWindow for more details. Players also use the /itemWindow to learn the skip enforcement policies for each item or container of items. See Set up skip enforcement, below, for details.
Here's a sample request:
GET http://localhost:3000/radio/v2.1/smapicontainer:42/itemWindow?reason=load&itemId=&queueVersion=QV:00001&contextVersion=CV:00001And a sample response:
{
  "includesBeginningOfQueue": true,
  "includesEndOfQueue": false,
  "contextVersion": "CV:00001",
  "queueVersion": "QC:00001",
  "limitedSkipsState": {
   "skipsRemaining": 3,
   "skipLimitReached": false
  }
  "items": [
  {
    "id": "CQTrack:1",
    "track": {
      "name": "Paradise By The Dashboard Lights",
      "artist": "Meat Loaf",
      "rating": { "type": "NONE" },
      "durationMillis": 500000,
      "contentType": "audio/mpeg",
      "policies": {
        "canSkip": true,
        "canSkipToItem": false,
        "canCrossfade": true,
      }
      "id": {
        "objectId": "SMAPITrack:1"
      },
    }
  },
  { additional items... }
  ]
}
Your cloud queue should return 10 items for optimal buffering. Each item contains:
- A unique ID
- A track with all of the relevant metadata. See the track playback object for details.
- The playback policies specific to that track. See Playback policy list for details. Note that the playback policies for a specific track always take precedence over the playback policies from the container.
- An optional
itemId. If this exists and it's not empty, be sure to return an item window that contains that item ID.
See the item playback object for more details about items.
Tracks vs. Advertisements
An advertisement, or ad, is a track with specific playback policies to prevent skipping and other actions.
Here's an example of some typical track playback policies, assuming the user has some skips remaining:
"policies": {
  "canSkip": true,
  "canSkipToItem": false,
  "canCrossfade": true
}
Here's an example of ad playback policies:
"policies": {
  "canSkip": false,
  "canSkipToItem": false,
  "canCrossfade": true,
  "isVisible": false // Optional...
}
Note that the canSkip playback policy should always be false for an ad, so that the user can't skip it. Additionally, you can optionally have isVisible set to false so that Sonos doesn't event the metadata for an ad to other listeners. See Playback Object policies for more details.
If the context playback policies allow for canSkipBack, then the ad should also overwrite canSkipBack with: "canSkipBack": false.
windowPlayhead
Now that the player has a window of tracks from the /itemWindow, it still needs to know which track in the window to play. The windowPlayhead identifies the track and the location within the track to play. This allows for continuity of control because your service can keep track of the listener location within the content and start playback on a different device if the listener pauses it and resumes it elsewhere. The windowPlayhead enables the listener to immediately begin listening from where they left off in the content. This makes their listening experience smoother and more consistent. Be sure that if you have a windowPlayhead, it is pointing towards a track that is in the windowPlayhead that you are sending.
If the player requested an item window without a windowPlayhead, it plays the items in the window from the beginning.
Example
The listener is in the middle of listening to "Paradise By The Dashboard Lights" by Meat Loaf on your app on their mobile device. To be precise, they're 33,123 milliseconds into the content. They want to continue listening on Sonos. They use the Control API features in your app to choose a Sonos player to continue the music. The Sonos player asks for the context and an item window. You've included their position in the windowPlayhead object in your item window. The Sonos player resumes playing the song at this position. Here's the itemWindow:
itemWindow: {
  ...
  "limitedSkipsState": {...}
  "items": [
  {
    "id": "CQTrack:1",
    "track": {
      "name": "Paradise By The Dashboard Lights",
      { additional metadata... }
    }
  },
  { additional items... }
  ],
  "windowPlayhead": {
    "itemId": "CQTrack:1",
    "positionMillis": 33123
  }
}
The windowPlayhead is a PositionInformation playback object. See the PositionInformation playback object for more details about windowPlayhead.
Add a timePlayed endpoint
Now you can add a time played endpoint:

Players report track usage to the /timePlayed endpoint. You can use this information to keep track of how long each track has played, for example, to pay royalties. Players post asynchronously to the /timePlayed endpoint. Do not rely on them for playback information or skip enforcement.
There are two types of reports:
- Update. The player sends you updates on a regular basis. When you return context information to the player in a
/contextendpoint response, you can specify aperiodicIntervalMillisvalue for the player to POST a/timePlayedreport with the specified regularity. Additionally, the player POSTs an initial update/timePlayedreport near the beginning of a track. - Final. The player sends a final report every time the listener skips or finishes a track. Don't use this value to implement skip enforcement. See below for how to implement skip enforcement.
Example /timePlayed report:
{
  "items": [
    {
      "id": "CQTrack:1",
      "track": {
        "name": ...
      },
      "type": "update",
      "durationPlayedMillis": 293000,
      "timeSincePlaybackMillis": 298000
    },
    ...
  ]
}
Support manifest fileWhen you enable the "support manifest file" capability, you must implement
/timePlayedfor all type of on-demand content (radio, audiobooks, on-demand tracks, and streams). Sonos players will no longer send SMAPI report requests. See Add reporting for details. See Add capabilities for details about capabilities.
Set up skip enforcement
To enable skip enforcement, your context playback policies must include the following:
context: {
  { ... }
  "playbackPolicies": {
    "canSkip": true,
    "limitedSkips": true,
    "canSkipToItem": false, // LEAVE AS TRUE IF DESIRED
    "canSkipBack": false
    { ... whatever else you want ... }
  }
}
The canSkip playback policy forces the player to fetch a new /itemWindow on each skip. You don't need the notifyUserIntent playback policy to get this information. But if you want to get notified about user interactions, you can add it. The notifyUserIntent playback policy sends a GET /itemWindow request with a reason that shows the user action. See playback policy list for details.
You must include the limitedSkipsState object in all /itemWindow responses. See Set playback policies for details about providing listeners with a limited ability to skip tracks.
Here's an example:
itemWindow: {
  { ... },
  "contextVersion": "CV:00001",
  "queueVersion": "QC:00001",
  "limitedSkipsState": {
   "skipsRemaining": 2,
   "skipLimitReached": false
  },
  { ...}
}
Let's assume Meat Loaf Radio has a skip limit of 2. Here's a sequence diagram of the requests and responses:

There are many different cases for skip enforcement. Here is each case, with what the limitedSkipsState in the /itemWindow response should look like. Keep in mind that if the canSkip policy is true in the context, you will get a new /itemWindow request on each skip.
One skip remaining
Here's the /itemWindow response with one skip remaining:
itemWindow: {
  "contextVersion": "CV:00001",
  "queueVersion": "QC:00002",
  "limitedSkipsState": {
   "skipsRemaining": 1,
   "skipLimitReached": false
  },
  "items": [
    {
      "id": "CQTrack:1",
      "track": {...},
      "policies": {
        "canSkip": true
      }
    }
    { ... other items ... }
  ]
}
No skips remaining, but allow one more skip
Here's the /itemWindow response if the listener has no more skips left but you want to allow one more skip before sending a SKIP_LIMIT_REACHED errorCode:
itemWindow: {
  "contextVersion": "CV:00001",
  "queueVersion": "QC:00003",
  "limitedSkipsState": {
   "skipsRemaining": 0,
   "skipLimitReached": false
  },
  "items": [
    "CQTrack:2" : {
      {...},
      "policies": {
        "canSkip": false
      }
    }
    { ... other items ... }
  ]
}
No skips remaining
Here's the /itemWindow response, if there are no skips remaining:
itemWindow: {
  "contextVersion": "CV:00001",
  "queueVersion": "QC:00004",
  "limitedSkipsState": {
   "skipsRemaining": 0,
   "skipLimitReached": true
  },
  "items": [
    "CQTrack:2" : {
      {...},
      "policies": {
        "canSkip": false
      }
    }
    { ... other items ... }
  ]
}
Replenish the number of skips available
Naturally, you eventually want to replenish the number of skips you want to allow in your container after some time. This is where you can update the queue version in your /version endpoint response to notify the player of changes to the queue. The player polls your /version endpoint frequently, so when you want to replenish the skip limit, change the queue version. When the player detects this change via the /version endpoint, it fetches a new /itemWindow:

Additionally, every time the player requests a new /itemWindow is an opportunity to replenish skips.
If your cloud queue server enables listeners to skip tracks after a negative rating, such as a skip on a thumbs down, and the user has run out of skips, don't return a windowPlayhead object. Sonos speakers honor the windowPlayhead position even if the skipLimitReached is true in the limitedSkipsState.
Ratings
You can enable listeners to rate tracks to steer your programmed radio solution to offer songs that listeners want to hear, while reducing songs that they don't want to hear. The rating response is almost identical to the itemWindow response. See Add ratings for details.
If the player wants to notify the cloud queue server about a rating, it will post to the rating endpoint using the following syntax:
POST <base-radio-url>/<containerid>/item/<itemid>/rating</itemid></containerid></base-radio-url>For example:
POST http://localhost:3000/v2.1/radio/smapicontainer:42/item/CQTrack:1/ratingThe rating object has a type, for example, THUMBSUP or STAR. It also has a state, such as RATED or UNRATED.
For example, if the user gave a THUMBSDOWN to Track id=CQTrack:1, the player would send the following:
// POST to http://localhost:3000/v2.1/radio/smapicontainer:42/item/CQTrack:1/rating

{
  "queueVersion":"QV:00001",
  "contextVersion":"CV:00001",
  "currentlyHeardItemId":"CQTrack:1",
  "rating": {
      "type":"THUMBSDOWN",
  }
}
Your cloud queue would respond with:
{
  "includesBeginningOfQueue": true,
  "includesEndOfQueue": false,
  "contextVersion": "CV:00001",
  "queueVersion": "QC:00002",
  "limitedSkipsState": {
   "skipsRemaining": 1,
   "skipLimitReached": false
  }
  "items": [
  {
    "id": "CQTrack:1",
    "track": {
      "name": "Paradise By The Dashboard Lights",
      { additional metadata... }
    },
    "rating": {
      "type": "THUMBSDOWN",
      "state": "RATED"
    }
  },
  {
    "id": "CQTrack:2",
    "track": {
      "name": "Bat Out Of Hell",
      { additional metadata... }
    },
    "rating": {
      "type": "NONE"
    }
  },
  { additional items... },
  ]
}
The itemId in the URL is the item that the user is rating, while the itemId in the payload is the id of the track that is currently being heard. If these IDs are different, such as if the user is rating at the end of the track, make sure that you do not return a windowPlayhead in the response, as it will cause an interruption in the playback.
Additionally, always make sure that the your response to GET /itemWindow is centered around the currently heard track ID.
Using ratings to skip a track
To skip a track after the listener has rated it negatively, for example with a THUMBSDOWN rating, simply return a windowPlayhead with the updated itemId in the returned response of the rating post. The player will immediately begin playing the new track.
Do not include a windowPlayhead object in your returned window items if you do not want the player to change what it's playing.
Removing a rating
Here's an example of how a listener could remove the rating from a track, to return it to the unrated state:

How the Sonos app loads a cloud queue
When you set up the speaker as previously described, you included an Endpoint URL and Secure Endpoint URL containing the location of your SMAPI server. For simplicity's sake, you should use the same URL for your cloud queue server that you used for your SMAPI server.
Legacy: LAN implementationIf you have a LAN implementation, you can load a cloud queue using a WebSocket and the Control API
loadCloudQueuecommand. See Playback sessions for details.
When a listener browses to a track on the Sonos app and plays it, the player creates its own playback session and makes its own calls to the cloud queue server, using the links described in your manifest. Each item in the returned itemWindow has an objectId and a serviceId, which the player uses to get the mediaUri, metadata, and extendedMetadata.
The sequence diagram below shows the steps taken by the app to load a cloud queue:

How favorites work
Use the trackList.program or station container type to set the behavior of the favorites feature for programmed radio. See Add favorites for details about this feature.
- Use
trackList.programto let listeners add individual tracks to their favorites in My Sonos. - Use
stationto let listeners add the station to their favorites in My Sonos. If you use thestationcontainertype, you must also support the Extended Metadata for radios capability. See Add capabilities for details.
Sequence diagram overview
Here's the full sequence diagram from the sections above:

Updated about 1 month ago