
Add app authentication
When a user decides to add your service to their Sonos system, they can authenticate using your iOS or Android app.
This section describes how to implement authentication using either mobile app. Before you read this section, you should understand how to implement authentication using a browser, as described in Add browser authentication. This example builds upon the browser example because your implementation should provide browser authentication as a fallback in case the user does not have your app installed or they are using the Sonos desktop controller.
Use case assumptionsThe use case and examples in this section show how to add your service to Sonos for the case where the user already has an account with your service and also has your mobile app installed.
If the user doesn't have an account, you can either add an action in your app to enable them to create an account, or fail back to browser authentication, as described in this guide.
For app authentication, authentication occurs on your app in between the two API calls getAppLink and getDeviceAuthToken, The app authentication process is summarized as follows:
- Enable app authentication. During the integration and submittal process you enable app authentication so that Sonos processing will include app authentication for your service.
- Your service returns an app URL for getAppLink. The Sonos app uses the API call getAppLink to send information about the user's Sonos system to your service. Your service responds with an
appUrlandappUrlString, which provides custom text the Sonos app presents to the user on the button for opening your app. - Your app authenticates the user. When the user clicks the button, Sonos opens your app instead of a Web page. The user authenticates on your app and approves the Sonos app for authentication as well. Your app then returns control to the Sonos app by using a callback with inter-app communication.
- Your service returns a token for getDeviceAuthToken. Sonos calls getDeviceAuthToken. Your service returns to the player a token that associates together the authenticated user and Sonos household.
After these steps, the user has your service on their Sonos system.
Enable app authentication mode
Sonos recommends you implement both the app authentication and the browser authentication modes. To use app authentication, you need to enable this mode by selecting OAuth when submitting your integration to Sonos. For more information, see Submit your service.
To test your app authentication implementation, use the sandbox integration submission form and choose OAuth in the Sonos Music API section. See Test your service for more details.
Providing an app URL in the getAppLink response
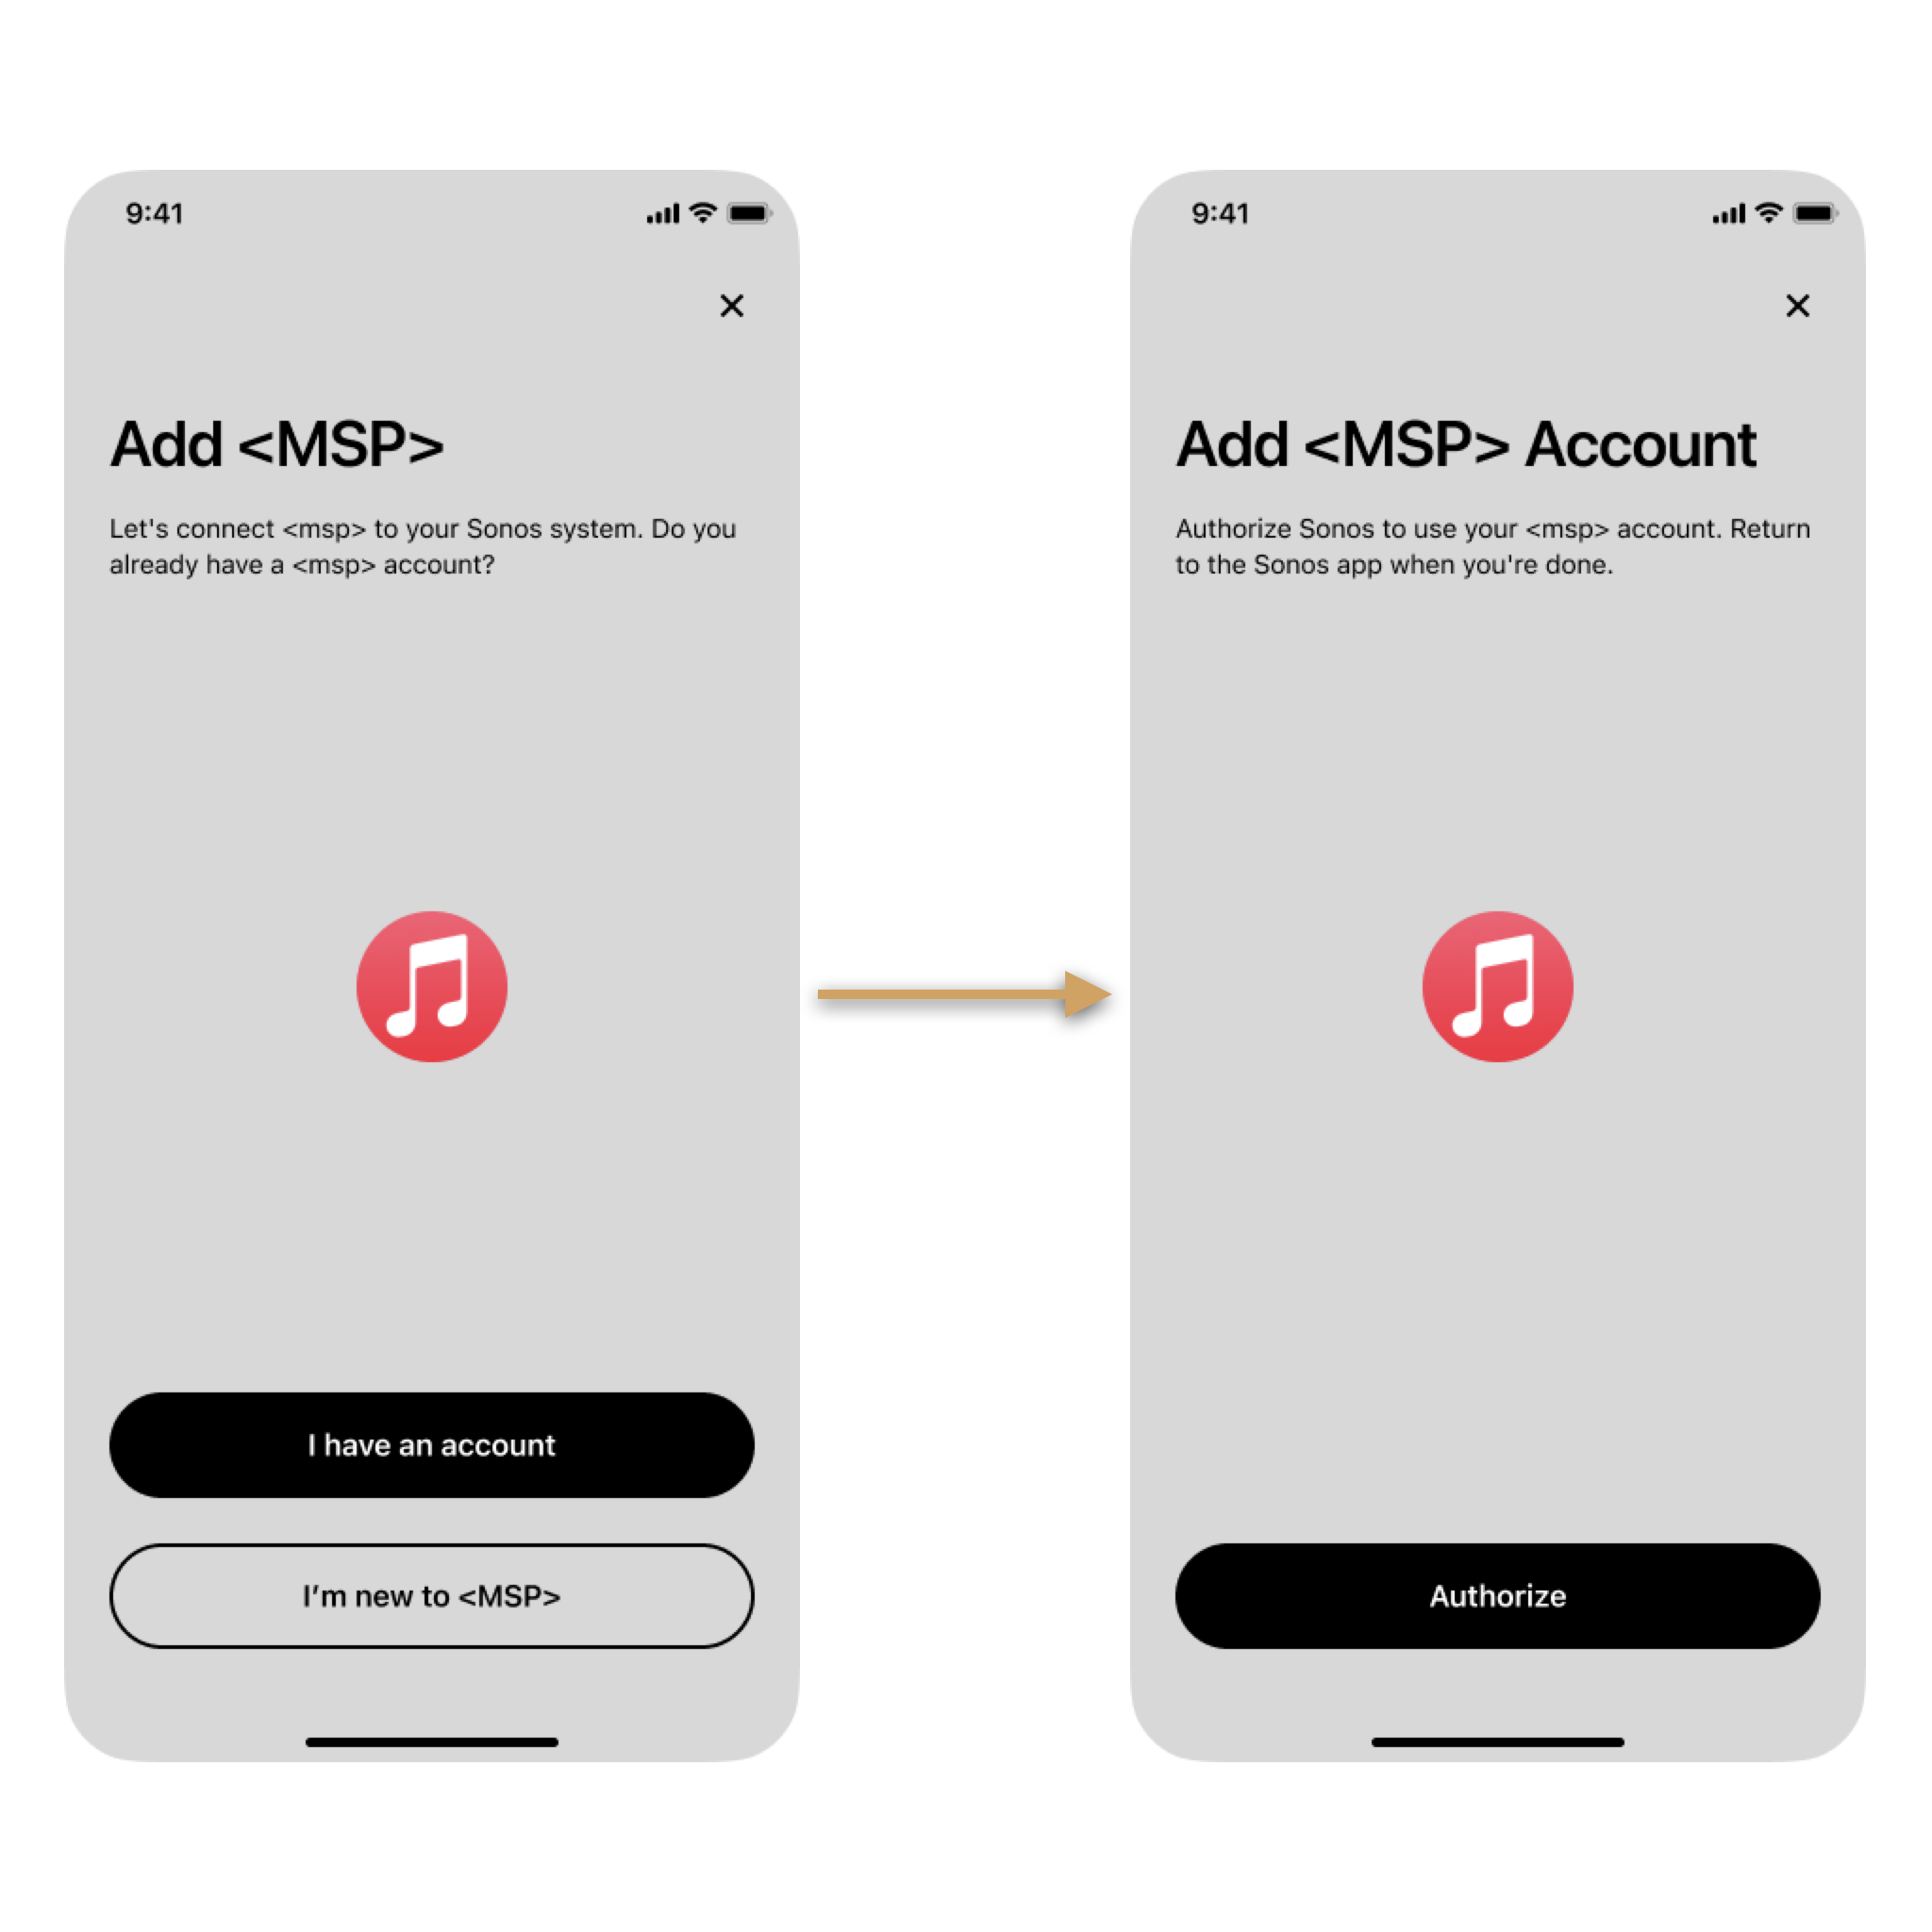
From the Sonos app, the user selects your service then selects Add to Sonos. In the following steps, the user already has an account with your service.
To include the app URL in the getAppLink response:
- The Sonos app sends your service a getAppLink request with information about the user's Sonos system and a callback path to the Sonos app. See the getAppLink reference page for request input details.
- Your service constructs the
appUrlincluding the callback as described below. - Your service supplies an ID from your Localization Resources in
appUrlString. The ID identifies a text string for labeling the button the user selects for launching your app. - Your service should also supply details for browser authentication as a fallback in case your app is not installed. See Add browser authentication for details.
- Your service returns
authorizeAccountand sub-elements to the Sonos app. - The Sonos app displays a button for the user to select for opening your app. If you supplied a
appUrlStringvalue, the button label is text from your Localization Resources. When the user selects the button, it activates the URL fromappUrl.

A sample getAppLink request looks like the following. See the getAppLink reference page for complete details.
. . .
<soapenv:Envelope xmlns:soapenv="http://schemas.xmlsoap.org/soap/envelope/" xmlns:ns="http://www.sonos.com/Services/1.1">
  <soapenv:Header>
    <context>
    </context>
    <credentials>
    </credentials>
  </soapenv:Header>
  <soapenv:Body>
    <getAppLink>
      <householdId>Sonos_ghsAflSonosakevCzmxcmFhN7pN</householdId>
      <hardware>iPhone8,2</hardware>
      <osVersion>Version 9.3.3 (Build 13G34)</osVersion>
      <sonosAppName>ICRU_iPhone8,2</sonosAppName>
      <callbackPath>
       sonos-2://x-callback-url/addAccount?state=sid%3D3079%26OAuthDeviceID%3DSonos_J9zl49YnRMtvgEYHPb4hJKvqYd_7d55e99%26callbackPath%3D%2FaddAccount
      </callbackPath>
   </getAppLink>
  </soapenv:Body>
</soapenv:Envelope>
Your service's response to getAppLink should be similar to the following:
. . .
<s:Envelope xmlns:s="http://schemas.xmlsoap.org/soap/envelope/" xmlns:ns="http://www.sonos.com/Services/1.1">
  <s:Body>
    <ns:getAppLinkResponse>
      <ns:getAppLinkResult xsi:type="appLinkResult" mlns:xsi="http://www.w3.org/2001/XMLSchema-instance">
        <ns:authorizeAccount>
          <ns:appUrl>acme-action://authorize?scope=playlist-read-private+playlist-read-collaborative+playlist-modify-public+playlist-modify-private+streaming+user-library-read+user-library-modify+user-read-private+radio-read+radio-modify&client_id=9b377073ea334637b1406f329ce005de&response_type=code&state=sid%3D3079%26OAuthDeviceID%3DSonos_J9zl49YnRMtvgEYHPb4hJKvqYd_7d55e99%26callbackPath%3D%2FaddAccount&redirect_uri=sonos-2%3A%2F%2Fx-callback-url%2FaddAccount</ns:appUrl>
          <ns:appUrlStringId>SIGN_IN</ns:appUrlStringId>
          <ns:deviceLink>
            <ns:regUrl>https://oauth.acme.com/deviceLink/home?linkCode=AKVS3FHEAUCXAQKLkMA</ns:regUrl>
            <ns:linkCode>AKVS3FHEAUCXAQKLkMA</ns:linkCode>
            <ns:showLinkCode>false</ns:showLinkCode>
          </ns:deviceLink>
        </ns:authorizeAccount>
      </ns:getAppLinkResult>
    </ns:getAppLinkResponse>
  </s:Body>
</s:Envelope>
Constructing the appUrl
appUrlUse the hardware, osVersion, and sonosAppName in the getAppLink request to decide what form the appUrl should be, or if you should return the appUrl at all. Use the following criteria:
- Check the
osVersion. If your app does not support this version of the operating system, do not return anappUrl. In this case authentication will fall back to browser authentication. - Check the
sonosAppName. This will help you determine which system the Sonos app is running on. If the prefix is:- ICRU, return a URL to the iOS app in
appUrl. - ACR, return a URL to the Android app in
appUrl. - MDCR or WDCR, the Sonos app is on a desktop so do not return an
appUrl. In this case, the Sonos app processing will fall back to browser authentication.
- ICRU, return a URL to the iOS app in
Include in the appUrl the following additional parameters, which follow the pattern of parameters in an OAuth 2.0 authorization request. For a Sonos appUrl all of these parameters are required.
| Parameter | Description |
|---|---|
scope | Enter the scope values you define for your service that indicate which parts of the user's account to access. The Sonos app does nothing with this but pass the scope through to your app. |
client_id | Enter the client ID value that represents Sonos to your service. This identifies to your app that the authorization request is from a Sonos system. |
response_type | Set this value to code, as required by the OAuth 2.0 specification. |
state | Obtain this value from the state parameter supplied in the callbackPath input. The state is an opaque string the Sonos app needs in the callback from your app to determine where to resume. This is especially important if the Sonos app closed and has to restart when the user returns from the app. |
redirect_uri | Obtain this value from the base URL in the callbackPath input. This is the Sonos app callback your app uses to return control to Sonos. |
The callbackPath in the getAppLink request contains a base URL for the Sonos app and a state parameter, which holds encoded query parameters for the Sonos app. An example callbackPath is as follows:

The redirect_uri (containing the base URL) and the stateparameters pass unchanged through the entire process as follows:
- From Sonos to your service in the getAppLink request.
- From your service back to Sonos in the getAppLink response.
- From Sonos to your app when the app starts up.
- From your app back to Sonos again in the callback.
appUrl for iOS
appUrl for iOSFollowing is an example of a constructed iOS appUrl returned in a getAppLink response:
<appUrl>
acme-action://authorize?scope=browse,playback,favorites;&client_id=9b377073ea334637b1406f329ce005de&response_type=code&state=sid%3D3079%26OAuthDeviceID%3DSonos_J9zl49YnRMtvgEYHPb4hJKvqYd_7d55e99%26callbackPath%3D%2FaddAccount&redirect_uri=sonos-2%3A%2F%2Fx-callback-url%2FaddAccount
</appUrl>
appUrl for Android
appUrl for AndroidFor an Android app you can use implicit or explicit intents in the appUrl. Implicit intents use normal scheme syntax and you pass the desired parameters in the URL. Then, on the Sonos app the parameters are converted into string/string intent parameters. See the iOS example, above.
We recommend explicit intents because they allow you to easily fall back to browser authentication. The following is an example of an Android appUrl returned in a getAppLink response.
<appUrl>
x-sonos-android-app://com.acme.music?S5ActivityName=com.acme.mobile.android.sso.AuthorizationActivity&version=sonos-v1&S5AppMinVersion=14944072&scope=browse,playback,favorites&client_id=9b377073ea334637b1406f329ce005de&response_type=code&state=sid%3D3079%26OAuthDeviceID%3DSonos_J9zl49YnRMtvgEYHPb4hJKvqYd_4d27509b%26callbackPath%3D%2FaddAccount&redirect_uri=sonos-2%3A%2F%2Fx-callback-url%2FaddAccount
</appUrl>
At this point you have completed processing for getAppLink.
Callback processing in your app
The Sonos app uses the appUrl that your service provided in the getAppLink response to launch your app. Then when your app is finished authenticating the user, it needs to extract the
The following diagram summarizes the processing required in your app:
- The user agrees to add their account for your service to Sonos.
- The Sonos app launches your app on the user's device using the
appUrlvalue:- On iOS, it uses the standard way to launch an iOS app using the
appUrlvalue. - On Android, it uses an intent result with the data in the URI set to the
appUrlvalue.
- On iOS, it uses the standard way to launch an iOS app using the
- Your app displays to the user a request to grant authorization to Sonos using whatever steps you choose, such as have the user enter their password to enable access.
- Your app extracts values from the URL parameters.
- Your app obtains an authorization code from your authentication service to grant access to Sonos. Sonos uses the code later to obtain the access token with a getDeviceAuthToken request.
- Your app sets a
codeparameter to the authorization code and sets astateparameter to the value from the input URL'sstateparameter. - Your app constructs the callback URL using the extracted
redirect_urivalue and addscodeandstateURL parameters. - Your app uses the Sonos iOS callback
appUrlURL or Android intent's result to send the user back to the Sonos app.

The callback URL must be the same value returned in the appUrl of the getAppLink result.
callbackPath allowlistIt's important to use the
callbackPathprovided in the getAppLink request, as the URL depends on the app.Sonos uses
sonos-1://for the Sonos S1 app andsonos-2://for the Sonos S2 app. If you need to allowlist these URLs, you should include the following URLs:
sonos-1://sonos-1-alpha://sonos-1-beta://sonos-1-dev://sonos-2://sonos-2-alpha://sonos-2-beta://sonos-2-dev://See S2 platform on the Components and interfaces page for details about Sonos S1 and S2.
Then add the following additional URL parameters:
| Parameter | Type | Required | Description |
|---|---|---|---|
code | string | Required | The authorization code obtained from your authentication service. |
state | string | Required | The state parameter that was sent when your app was invoked by the Sonos app. |
nickname | string | Optional | Your app can provide a nick name, which Sonos uses to pre-populate the Name field in the setup wizard. However, the user can choose to override the nickname. Although you can provide the nick name here from your app, we recommend you provide it in your service's response to getDeviceAuthToken, which works for both app and browser authentication. |
errorCode | int | Optional | An error code value greater than 0. This should rarely be needed except for internal debugging. If you design your service to minimize errors when constructing the appUrl, there should be minimal errors in the input parameters when the Sonos app invoked your app. |
errorMessage | string | Optional | The ID for the error message string (in your Localization Resources file), which is displayed to the user in the Sonos account setup wizard. Used with the errorCode parameter. |
Constructing callback URL for iOS app
The following is a sample of a callback URL for iOS:
sonos-2://x-callback-url/addAccount?code=AQBqSt6VkTlDU9YDGwGkEXNMLzUaut0KfZslJoObyXMeeL5WFAGoTZJDMtIdoFISKnqFcvgPWLPGuucVpjMnSkZK-C1UgUHI9O4QLAqhVRpL8k1kXA69cyyOjT2xqw3kmUmFVKwcCgfLbPKKMaeHv46Rrr2VYrm4xewqEqKOCksNKJaeLAyck7DjEzFXrA_gAwOPx336q_X4j7zzlF95t-DE-c6MfeDF265M2CArMiGeMbK3Gg6cBBG_c5OA8qpHdVP9d-uEzEmRiKj2aPnCQIZzJjuKKLarHZcE5tzmsHRrEoHF8ZMOstIB4inV27UipNLpr1nR13AekbnEqLs1wA-QkcIULwJR3XTXDszzVVQSfnE9gSwqORVxiG3Mso8XVieV_SAWrthH1th9BmB14amznOnA0haIW7OdwYKSrPJJWdcfQzSUXNNoohx9VDTKFPSRdrtfYccNFTz9SZcRFA&state=sid%3D3079%26OAuthDeviceID%3DSonos_J9zl49YnRMtvgEYHPb4hJKvqYd_439eae3e%26callbackPath%3D%2FaddAccountConstructing callback URL for Android app
On Android devices, instead of a callback URL, you use intents. When your app has finished all necessary steps, it should use putExtra(String, bundle) for the required parameters and any optional parameters. The required parameter keys to be included in the intent are the following:
com.sonos.MusicServicesWizard.extras.callbackPathcom.sonos.MusicServicesWizard.extras.codecom.sonos.MusicServicesWizard.extras.state
The optional keys for the intent are the following:
com.sonos.MusicServicesWizard.extras.nicknamecom.sonos.MusicServicesWizard.extras.errorMessage
The Sonos app expects the values to come back in the Intent parameter of onActivityResult(). For example:
onActivityResult(int requestCode, int returnCode, Intent data)If the returnCode is greater than 0, Sonos will use the string com.sonos.MusicServicesWizard.extras.errorMessage.
Respond to getDeviceAuthToken with the authorization token
getDeviceAuthToken with the authorization tokenAfter your app authenticates the user and returns control to the Sonos app, the following process flow occurs:
- The Sonos app sends to the Sonos player a request to add an account.
- The Sonos player sends your service a getDeviceAuthToken request with the
householdIdandlinkCode. - Your service requests authorization be granted by making a request with the
linkCodeto your Authentication service. - The Authentication service returns an authorization token to use for authorization. You can use any format you wish for authorization tokens using up to 2048 characters. Your service must be able to decode the user from the token so that it can perform actions on the correct account, such as setting a user favorite. if a user connects to more than one Sonos household, your service must use a different token to represent that user-household combination.
- Your service can optionally set the
nicknameanduserIdHashCodevalue.- Your service can provide a nick name, which Sonos uses to pre-populate the
Namefield in the setup wizard. However, the user can choose to override the nickname. - Your service can provide a hash code, which Sonos uses to verify the account is unique and not being added to Sonos again.
- Your service can provide a nick name, which Sonos uses to pre-populate the
- The player verifies the account with the hash code and creates the account.
- Finally the Sonos app displays a message to the user that your service has been added to Sonos.

For details and an example, see the section, Success Response to getDeviceAuthToken in Add browser authentication.
Updated 4 months ago